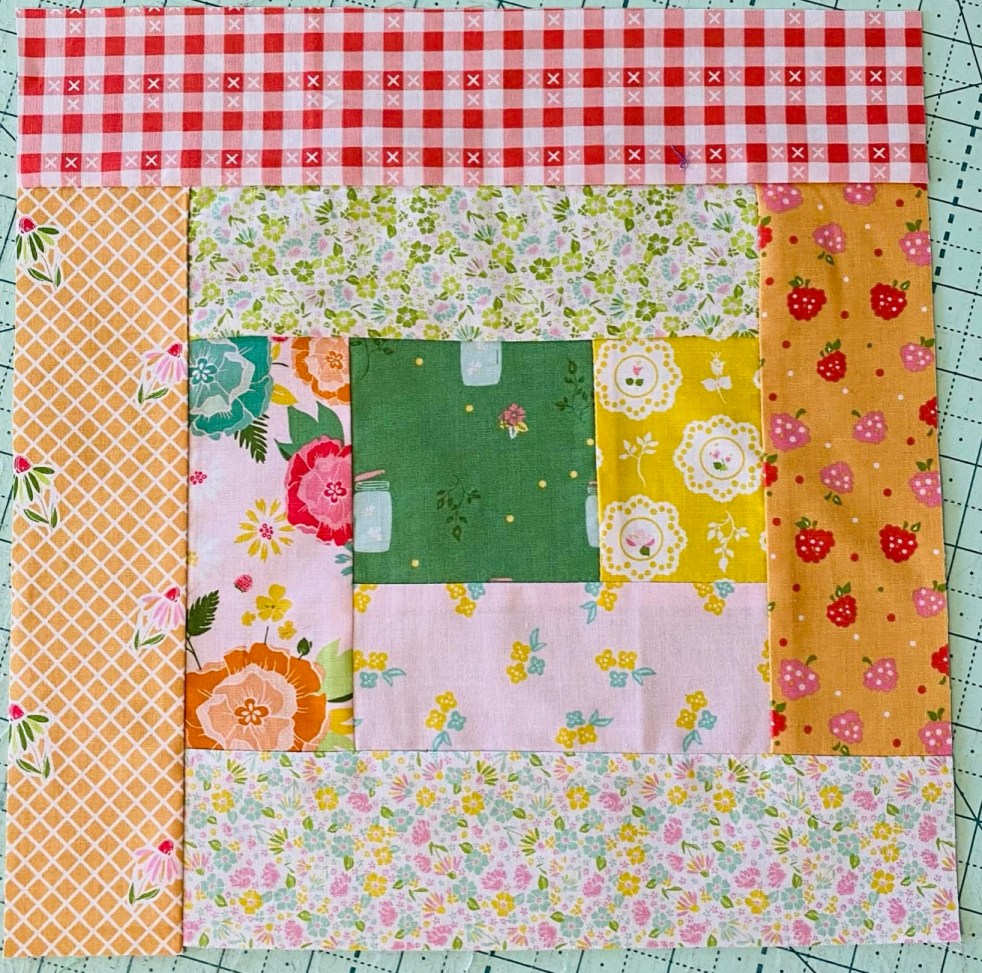
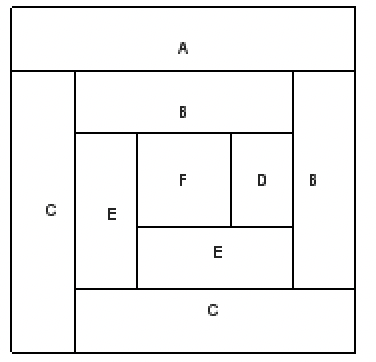
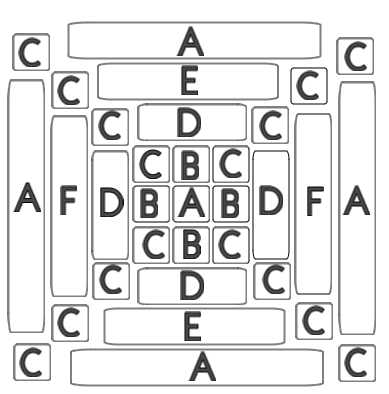
Log cabin blocks are very versatile and y to play with. They start with a centre and work around the centre with strips. You can start on the top, side or bottom, you can use the same width strips or strips of different widths. This one is a pretty standard.
Before you ask why the letters for the strips are not in order, the program I use sets the letters, not me..
F: 3.5 inch square
D: 2.5 x 3.5 strip
E: 2.5 x 5.5 inch strip (need 2)
B: 2.5 x 7.5 inch strip (need 2)
C: 2.5 x 9.5 inch strip (need 2)
A: 2.5 x 11.5 inch strip
Sew D onto F
Sew E to the bottom
Sew E to the side
Sew B to the top
Sew B to the side
Sew C to the bottom
Sew C to the side
Sew A on the top
Finished.
You can keep going and make it bigger if you would like.
Make sure to iron after sewing each strip and use a 1/4 inch foot.
Have fun making these into quilts, pillows, pot holders etc.
Here’s a super easy block perfect for scrappy projects. Can be used for pillows, runners, quilts, just adjust the measurements to suit your project. I will be making variations of this block on up coming projects
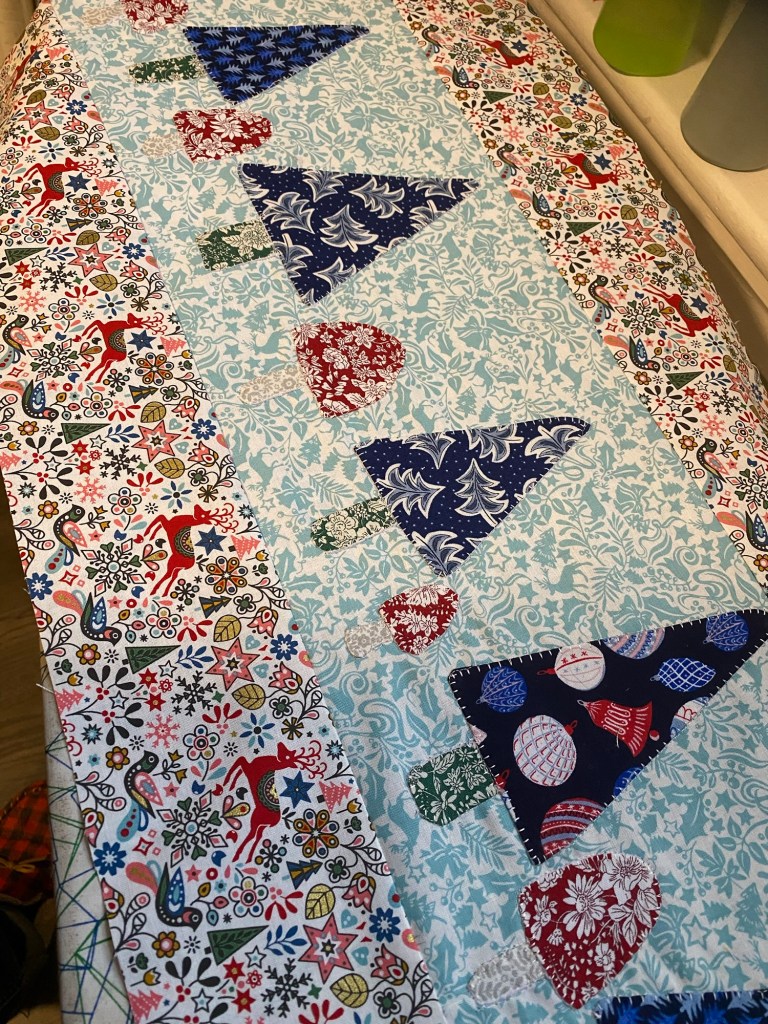
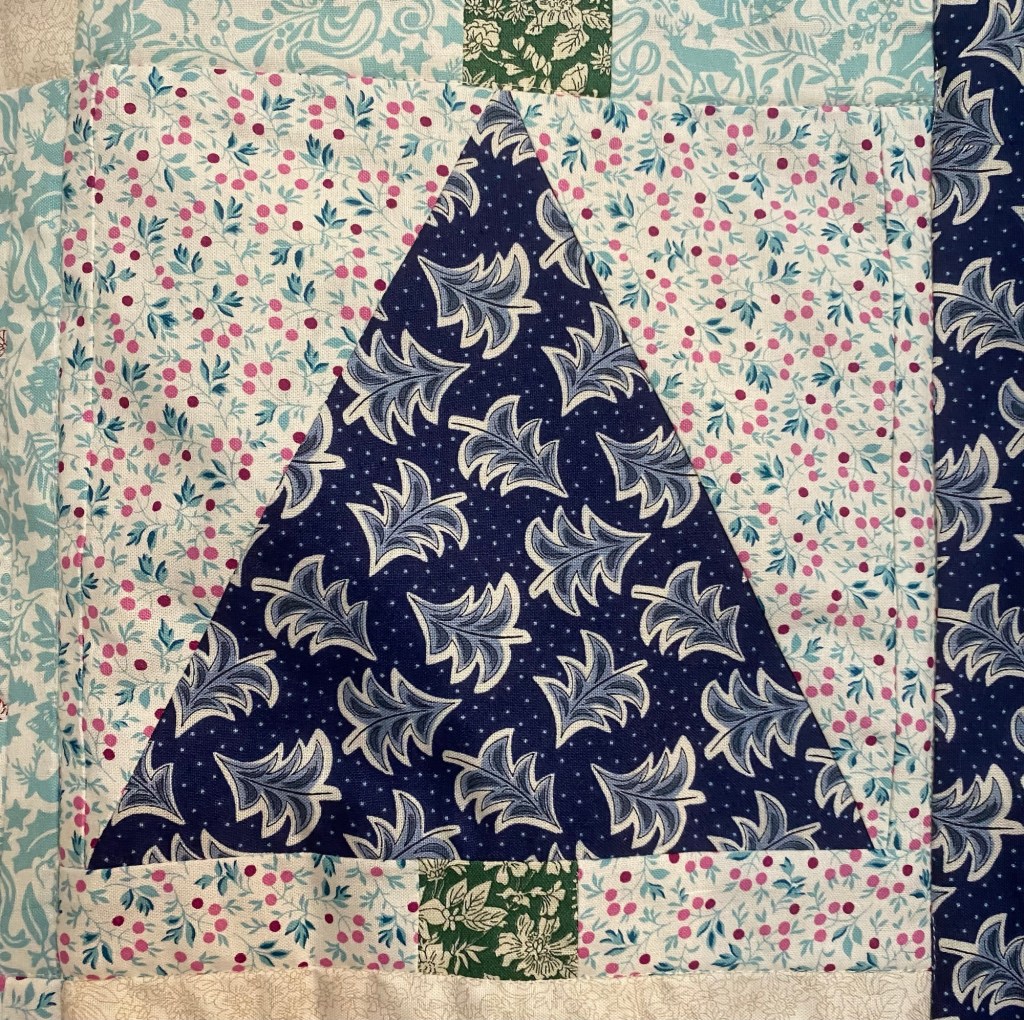
I am not a Christmas person, but I do love to decorate for winter. It adds personality to this old Victorian home during the bleak season. I’m obsessed with trees & mushrooms as they can stay out until Feb.
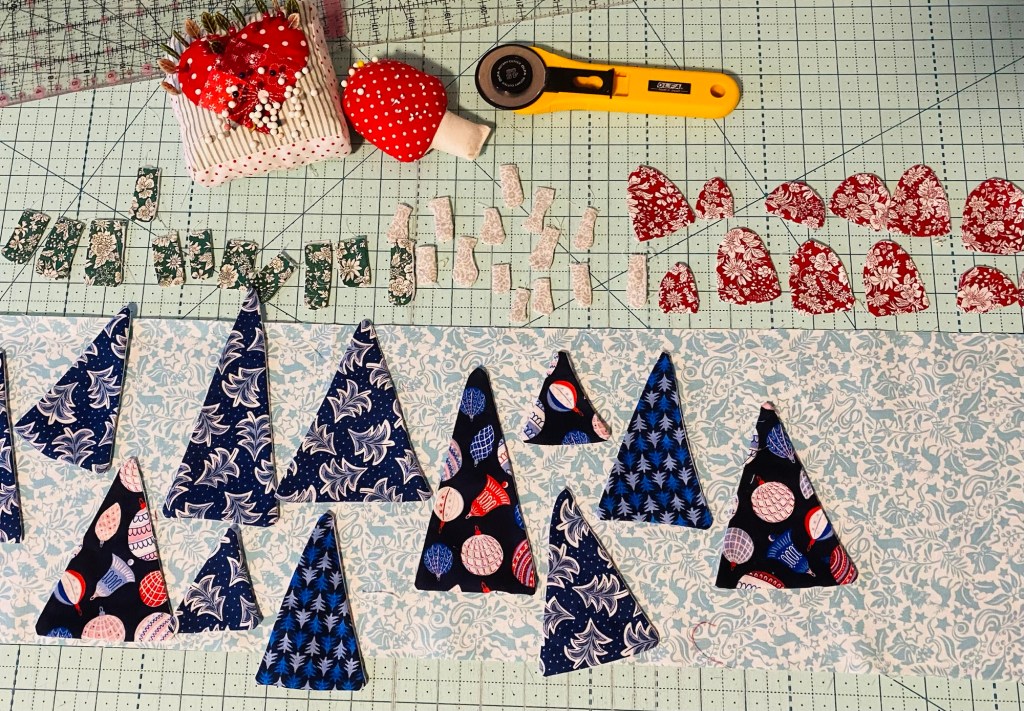
This runner was made with the liberty of London lines Merry & Bright and Woodland Christmas. There is no set pattern but here’s what I did, get creative and have fun.
Runner back ground was a 9 inch cut from a half yard piece of fabric, so it’s about 20 inch long once finished
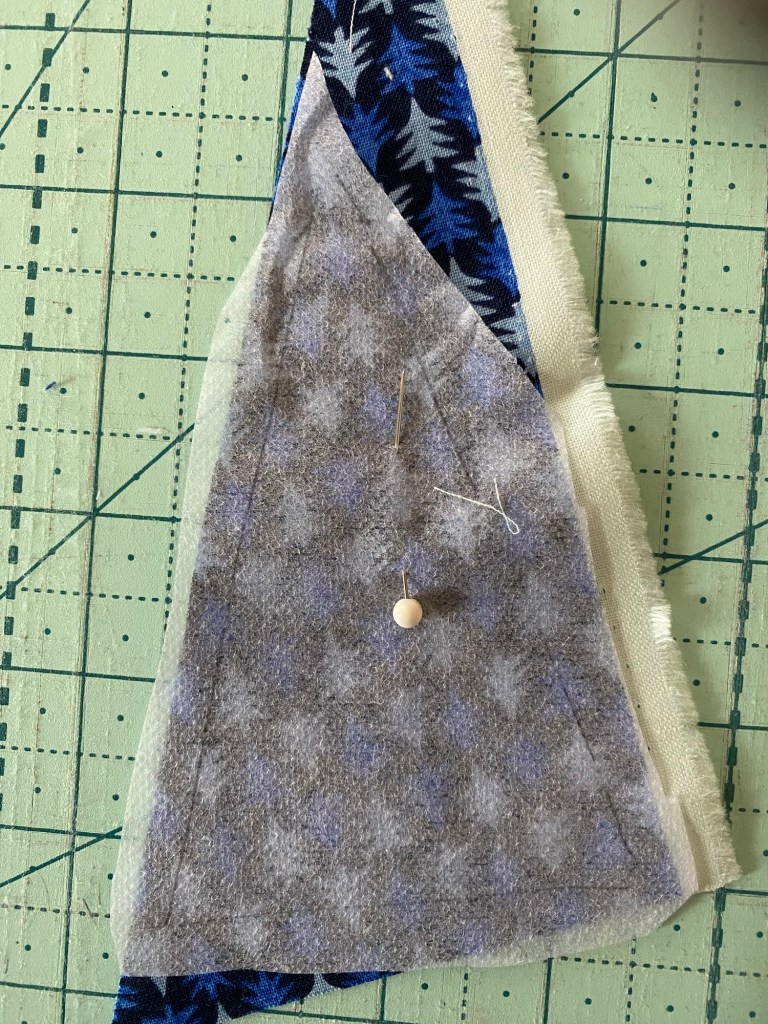
To make the trees and mushrooms: Take some lightweight interfacing and draw triangles in various sizes, trunks, mushroom bottoms and tops making sure there’s around 1 inch between shapes. Cut the shapes leaving 1/2 inch around the drawn lines so you can sew and trim. Place on fabric with the fabric right side up,you will “trap” the fabric in the interfacing. For the trees and mushroom tops sew around the whole shape. Trim to 1/8 around the shape, make a slit in the centre of the interfacing and turn the shape right sides out. For the trunks and mushroom stems, you can leave the top open and turn through that. The tops will be tucked under the trees and mushroom tops to hide them.
Once they are turned tight side out, iron.
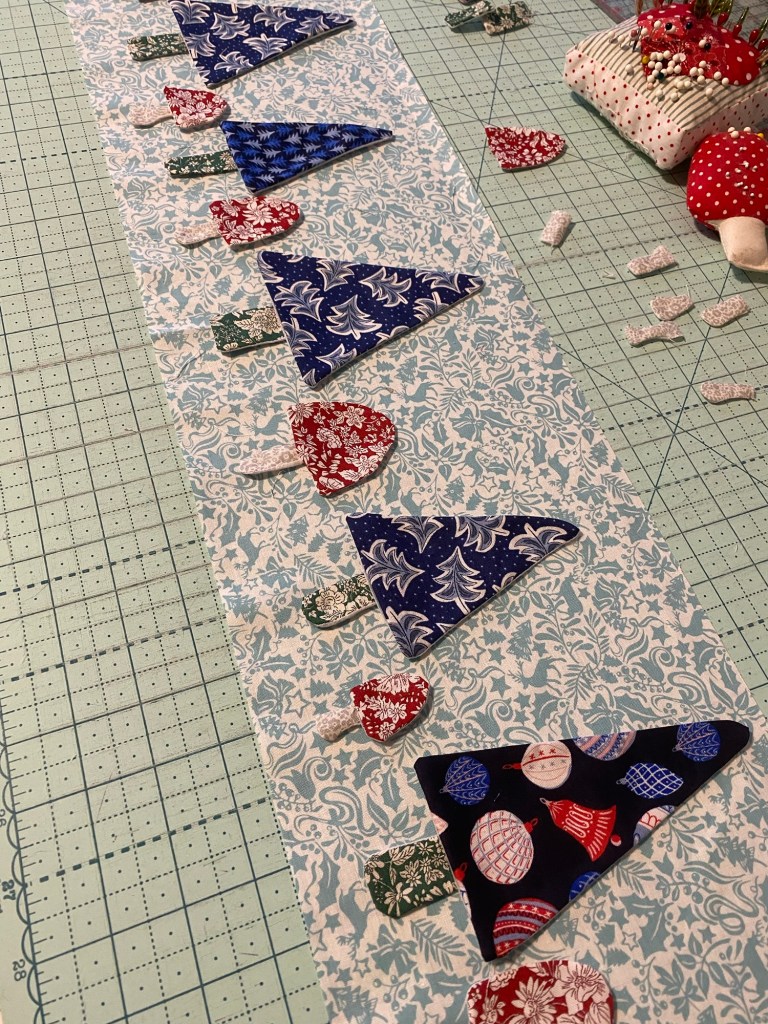
Lay out your back piece and place the trees and mushrooms where you want and pin in place.
Sew them by machine or hand to the background. I like to use the blanket stitch in my machine.
Once you have sewn them all down, add a boarder and finish as desired.
For appliqué shapes I like to draw the shapes on card stock so I can keep the templates. Mushroom and trees are easy as there’s no set shape. I have videos on my YouTube channel on how to make & sew the appliqués and how I finish runners
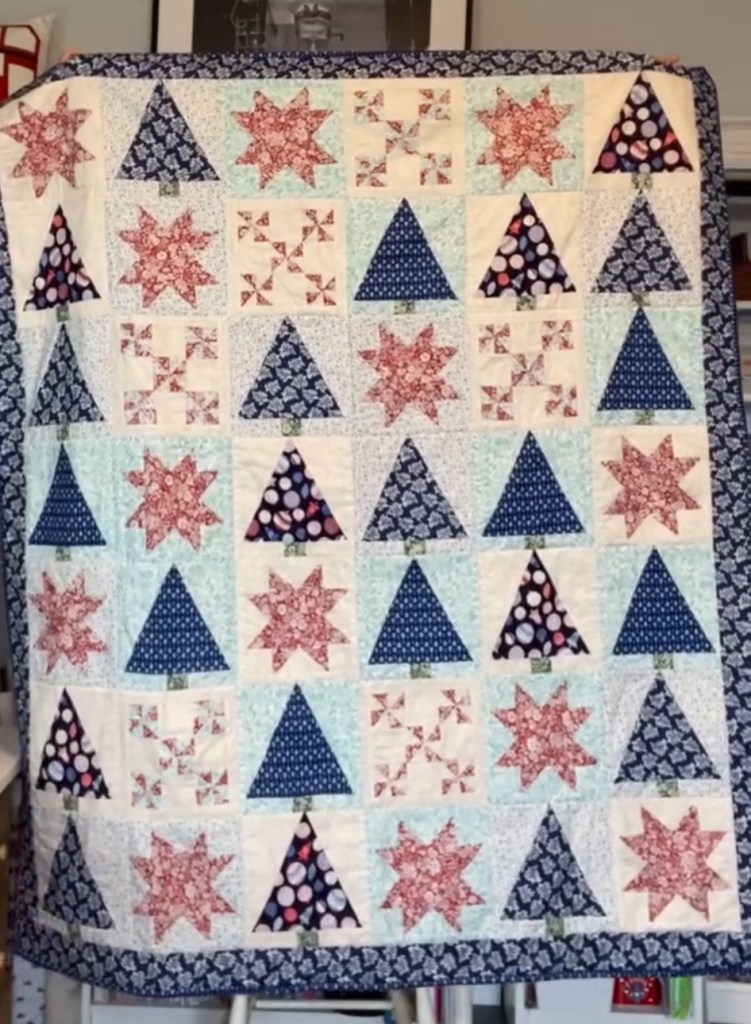
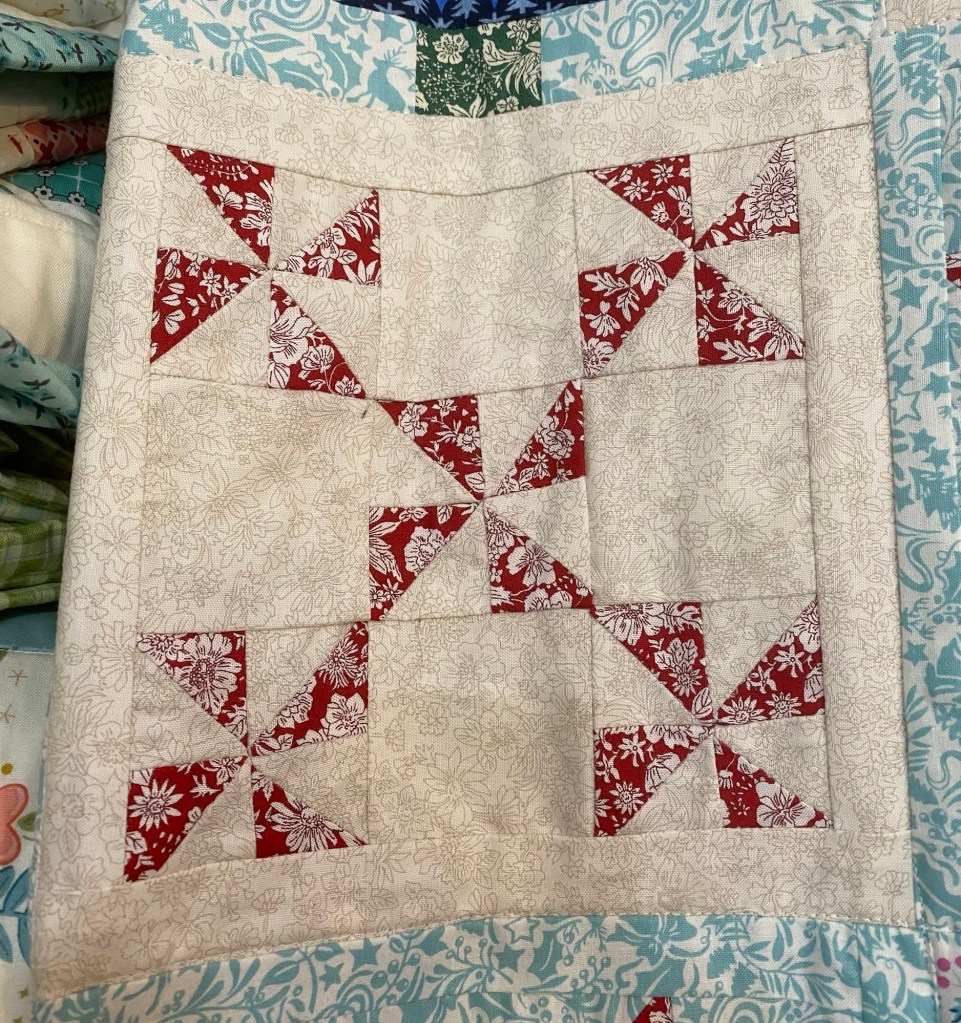
I have been wanting to play with my winter Liberty prints for a long time, but I couldn’t come up with design I liked. While going through the Liberty website for inspiration, I found some patterns! Free ones! This quilt is three blocks, the tree is from one quilt, the star is one from another and the last block is.. scraps from making the stars!
Here are the links to the free downloadable patterns:
Use the star block instructions. The pattern also has stars that are in a snowball that can also be used.
Scrap Snowflake Blocks:
Here is my YouTube video on how to sew scrap blocks when making flying geese for the stars:
I made 6 star blocks and used the scraps to make these fun snowflake blocks. Make 30 pinwheel blocks from your star scraps. Trim to 3 inches. To make the block, sew a patchwork of 5 pinwheels and (4) 3 inch squares of a background print per block.
All blocks I added a 2 inch boarder around and ended up trimming to 8 inches. It would be 9 or 8.5 but I mess one one up and just went with 8 inch
I made 42 blocks all together. The layout can be any combo of the blocks as it’s a snowy forest kinda look, feel free to add in other 8 inch blocks.. it’s your quilt, have fun!
Its been a crazy summer as usual here, being on a major tourist route makes summer time fly by. I love meeting visitors from all over the globe, it makes it all worth it.
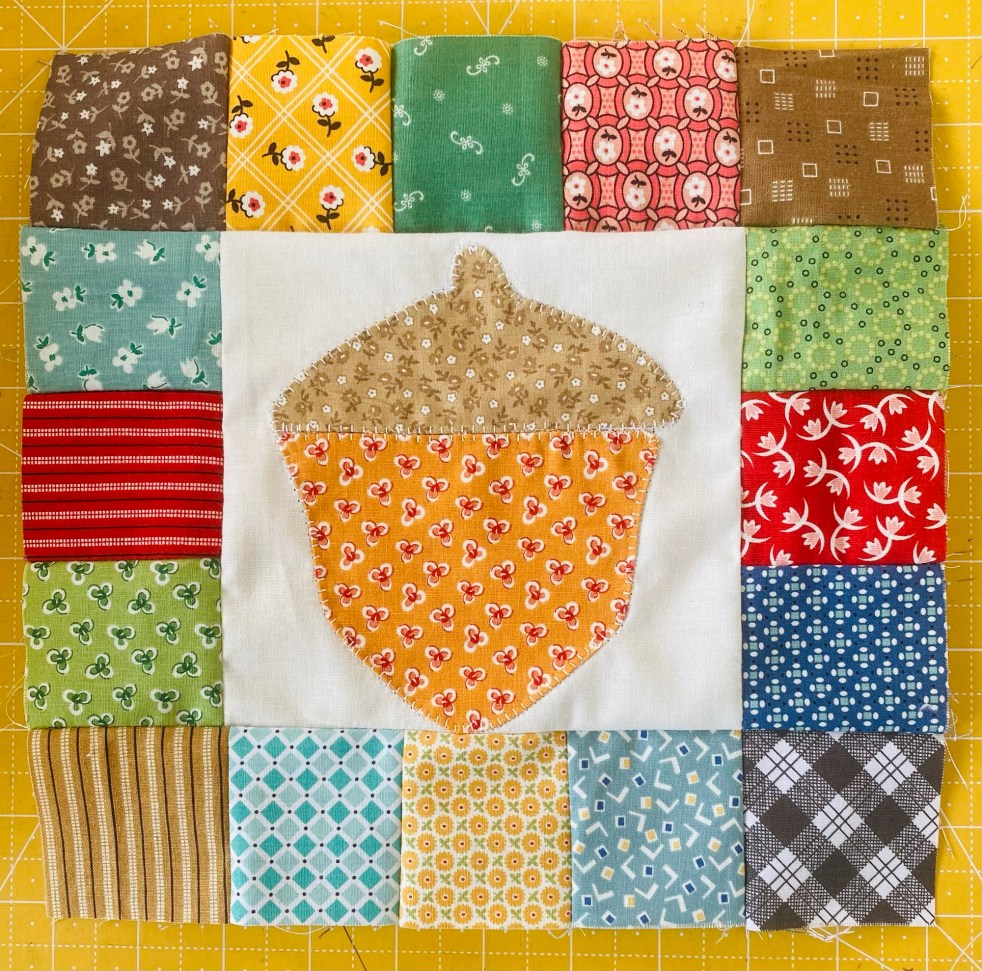
As my shop is so small, I have been thinking of ways to showcase new fabric collections, it has to be small as doing full quilts are hard to show off and June – Sept its very hard to even get a full quilt made. The solutions is pillows! I have been playing with fun blocks that use squares and strips, blocks that showcase the prints and can be beginner friendly. I have free pattern cards at the shop or you can use the post here to make the pillow or make several and make a quilt!
This pillow is made with the Woodland Walk Collection by Liberty Of London
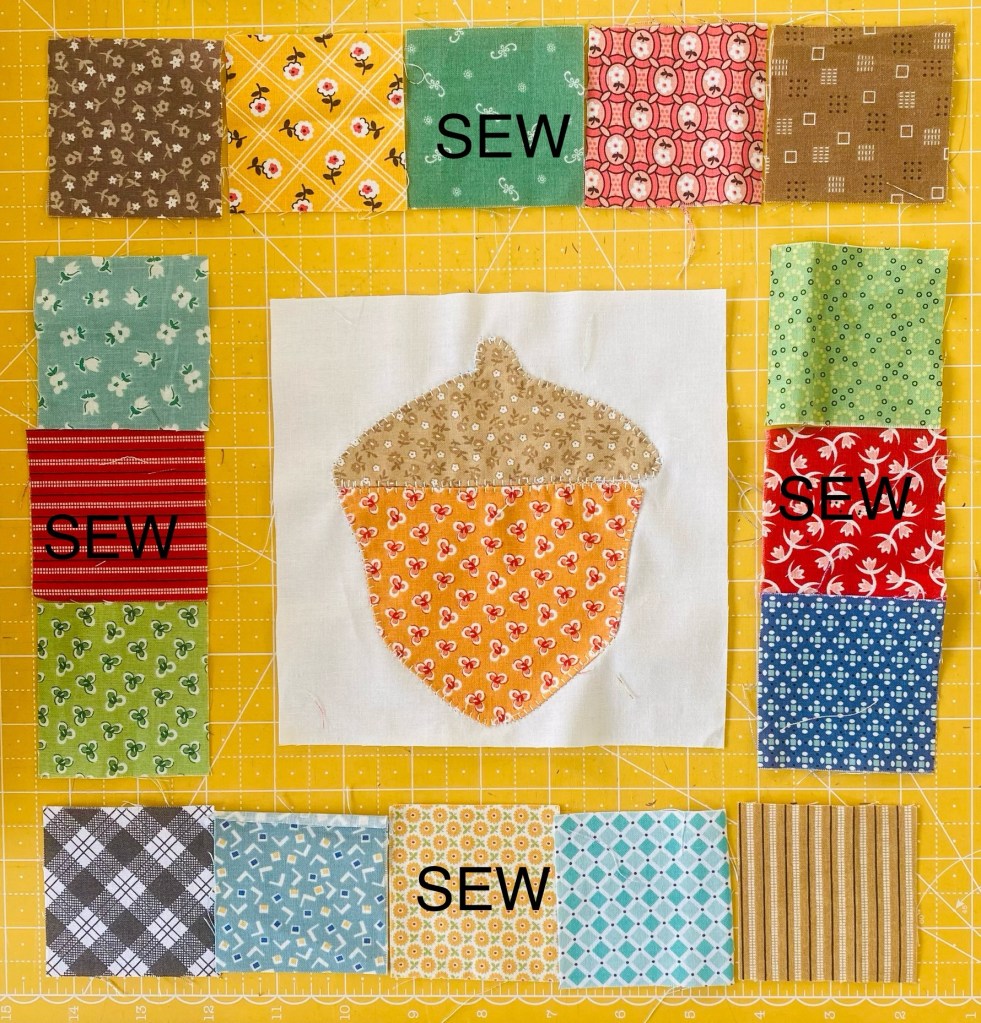
What happened between the last post and now.. summer tourism! I was not expecting it to be as crazy busy this year as it ended up being, but its all good. Now back to being able to sew things that are not urgent! I will catch up on a few things but for now here is a quick fun block I love to make.
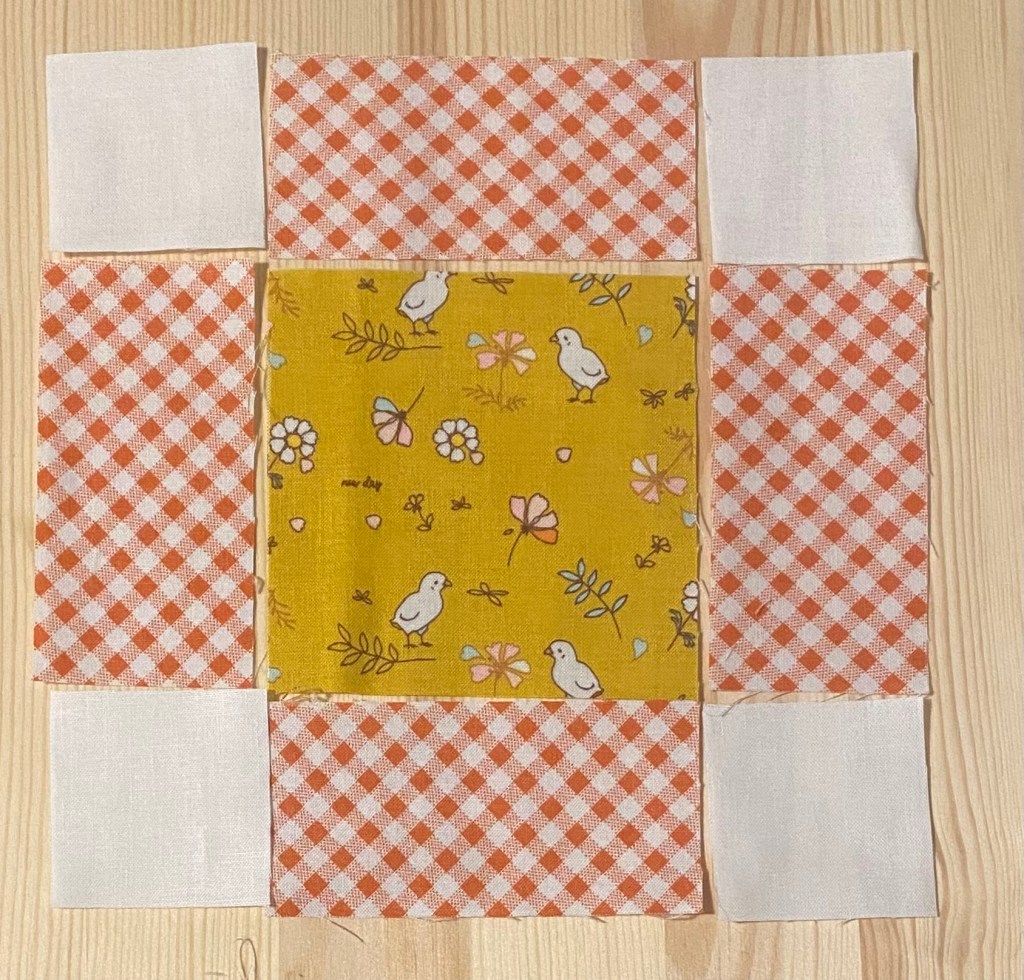
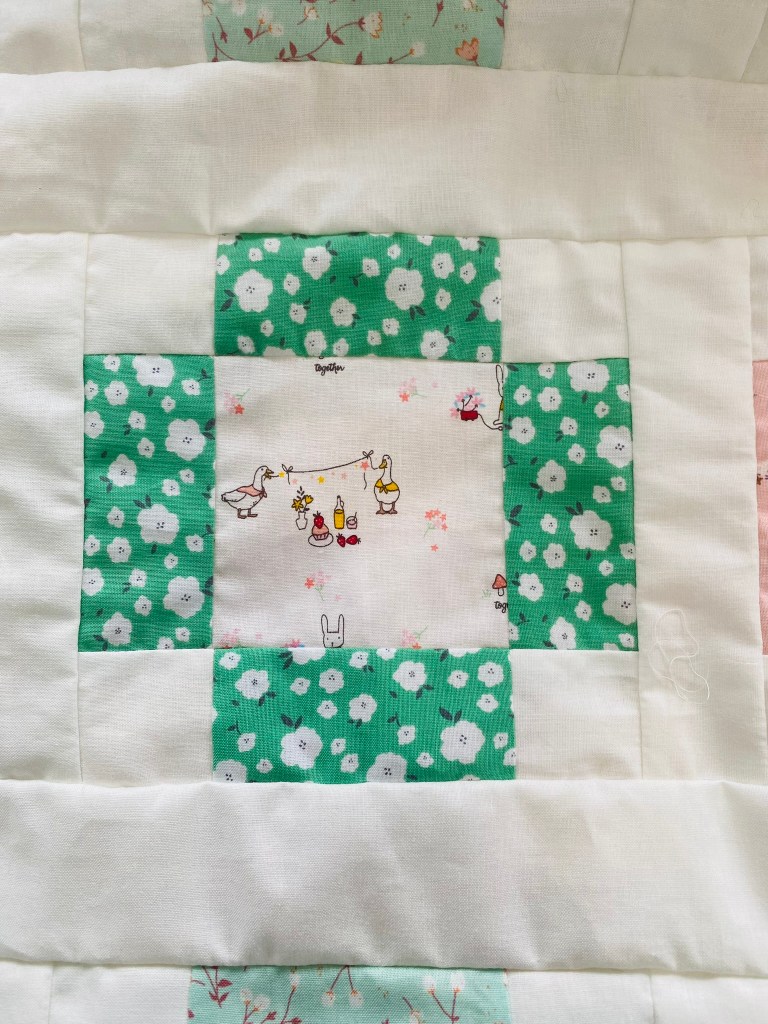
The one I am currently making is made up of a 4 inch center square, (4) 2×4 inch sides and (4) 2 inch corner squares in off white. The finished block is 7 inches.
Material used is 10 Fat Quarters of Hidden Cottage by Minki Kim, you will have extras left over for something else. I used Confetti Cotton in Off White, I am working from a yard cut I have, so facture in a yard.
Side Note: I also like to make theses with 3.5 inch centers, 1.5 x 3.5 sides & 1.5 inch corner squares. I may do a post on the other quilt I have on the go using this size.
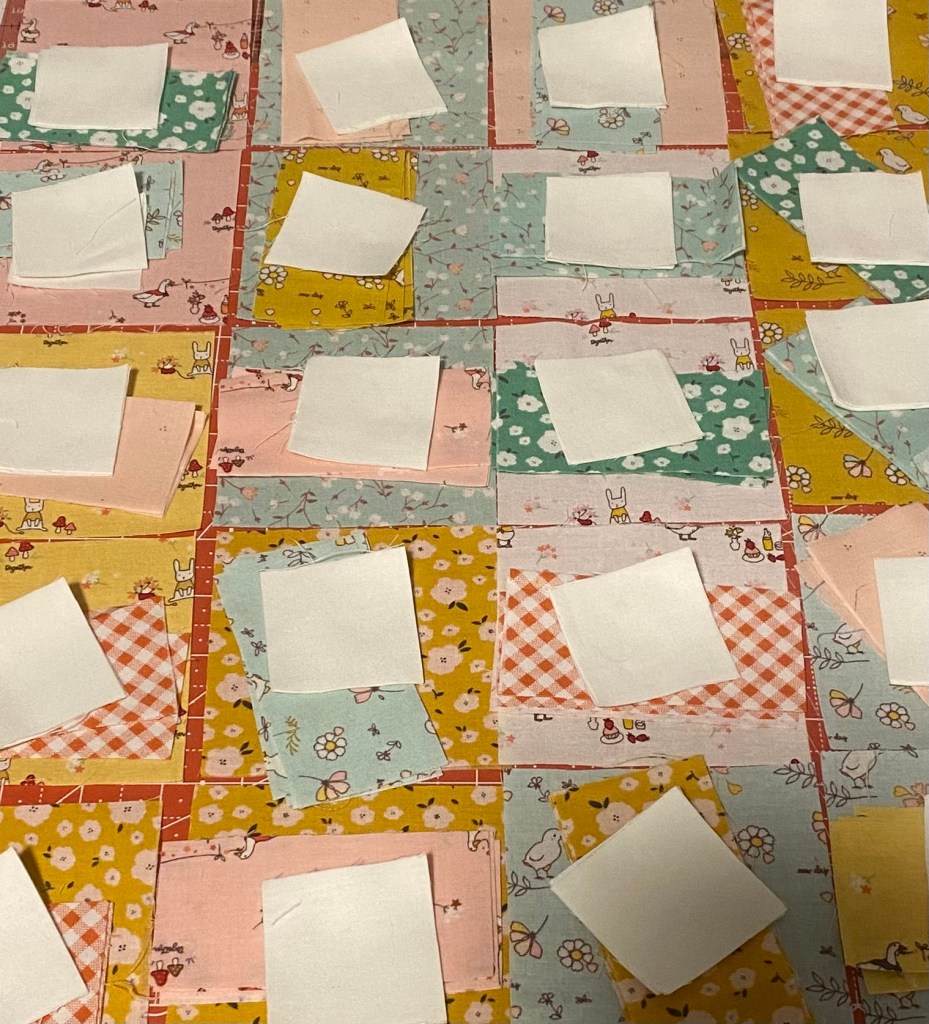
I try to make them scrappy, I cut (30) 4 inch centers, 3 from each fat quarter. Then cut all the side pieces.
From the off white I cut 2 inch strips, then sub cut into 2 inch blocks.
I like to lay out all the inner squares, put sides on top then the 4 2 inch squares each block requires. They are then ready to sew.
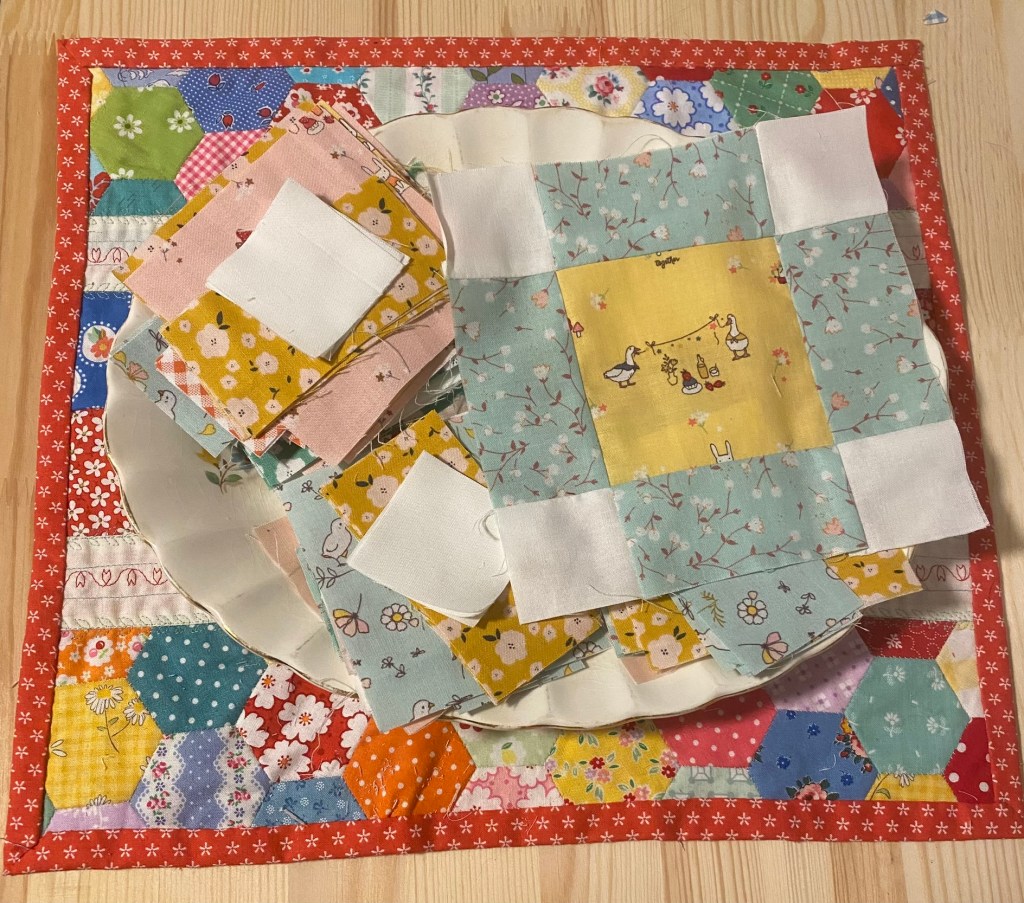
I like to stack mine on a vintage plate, you can use anything, I just really like vintage china and try to use them in weird ways. Sew together & iron.
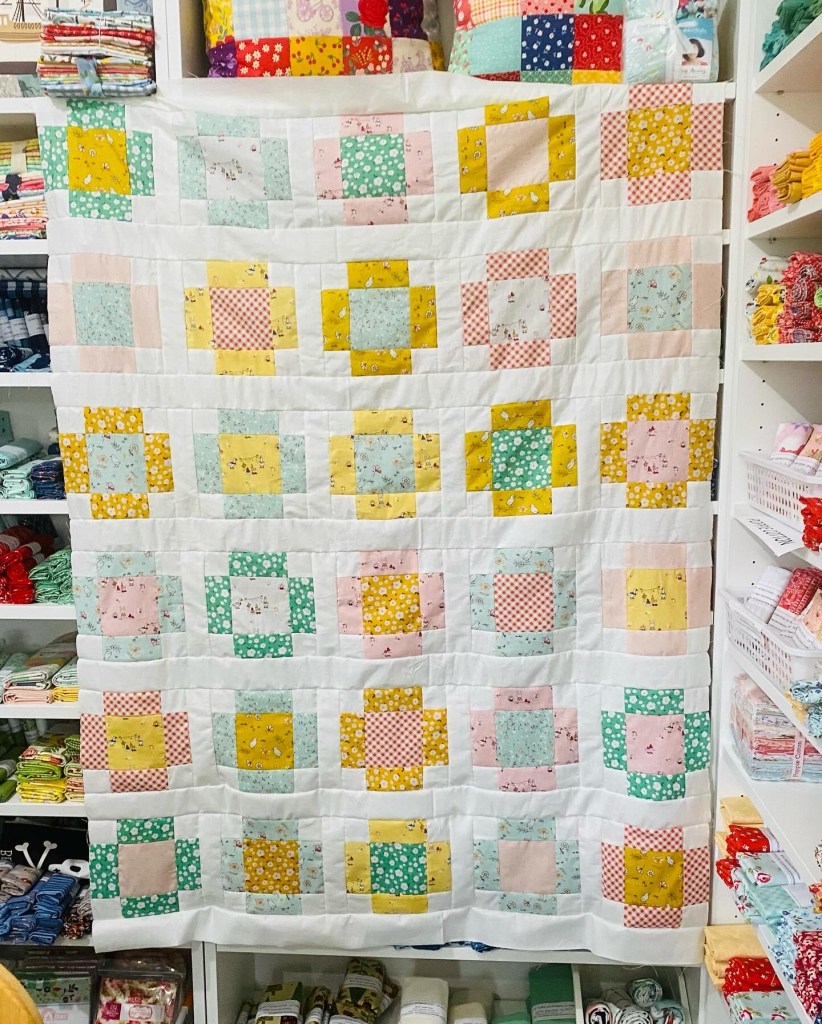
Lay them out somewhere and play around until you like how it looks. This quilt will be 5 block across, 6 rows total. Stack them how ever your brain likes to do that and sew into rows using 2 inch x 7 inch strips in the off white in between the blocks.
I used 2.5 inch strips in the off white as my boarders on all sides, added on after this picture was taken. Cute & Quick .. now into the to be quilted pile it goes!
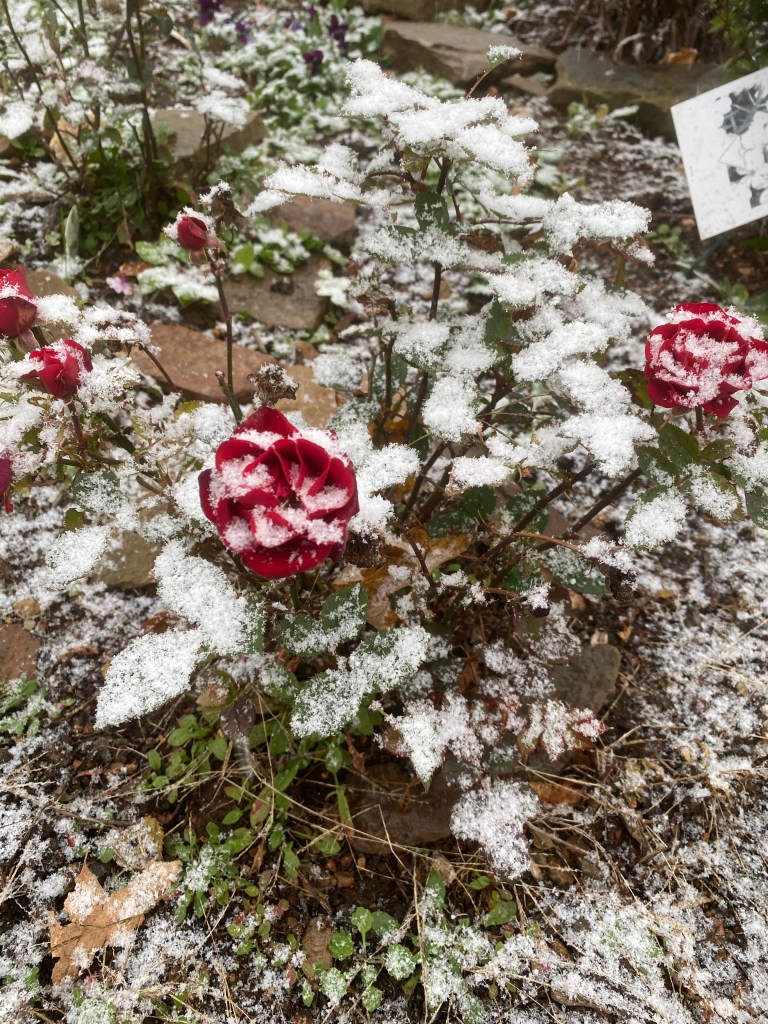
What else has been going on? SNOW! Too early.. I am not a winter person. The flowers are still blooming, they were not expecting snow either. I managed to get all the dahlias dug up and in before it hit. Here’s a few frosty flower pictures.. poor roses!
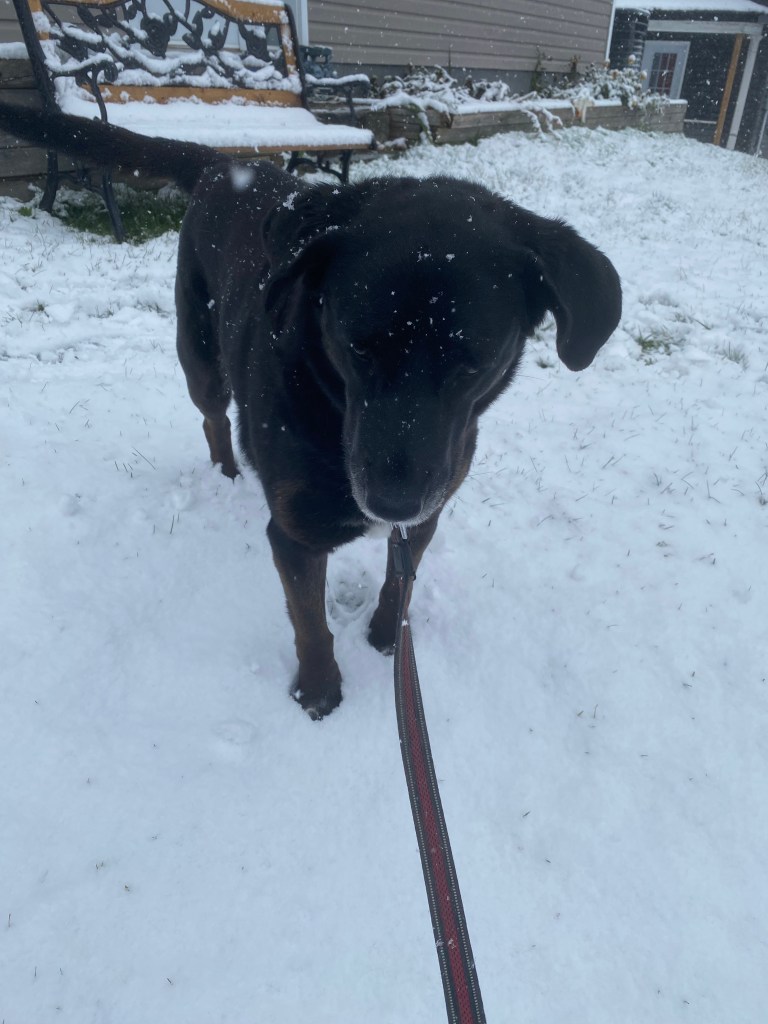
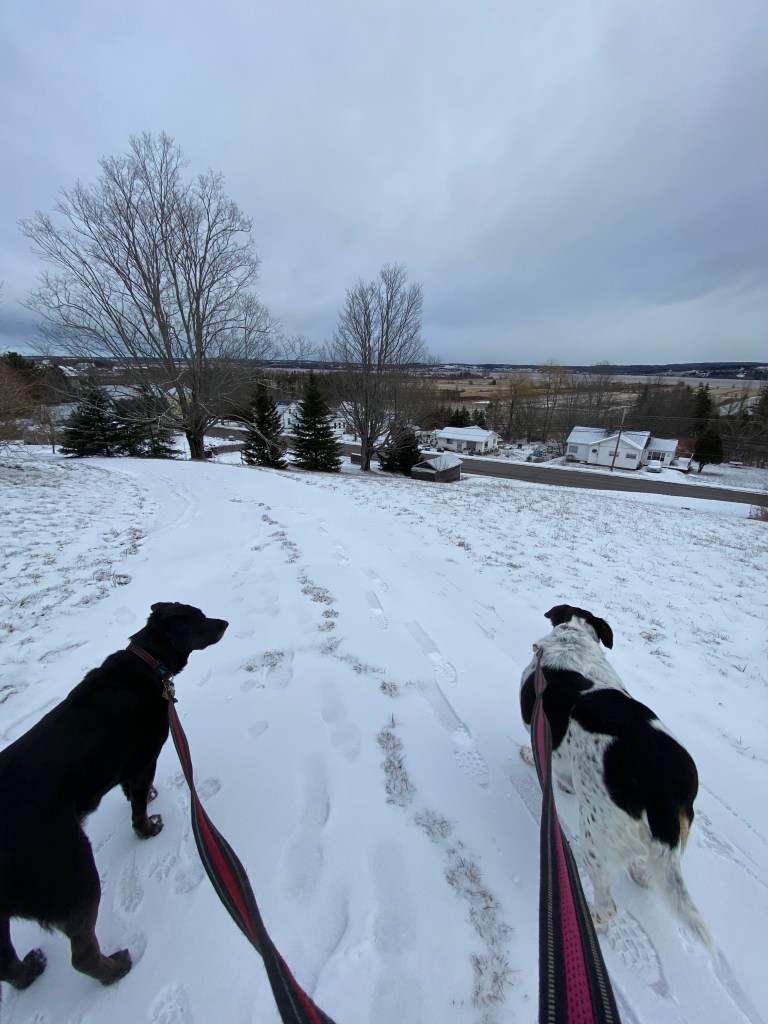
Scouse on the other hand was very happy to see the snow. She LOVES it..
Its Nov now .. I will get another post ready. Hopefully wont be as long in between as the summer ones here .. That was a crazy summer!
Im not sure how it became June already, but it is. Tourist season is picking up and its refreshing to see and talk to so many new faces.
When I opened my shop last year and being very new to the area, I had no idea I would be the first stop for most tourists coming down from Moncton to Alma. I was – to say the least- not prepared! We moved in the end of November and with winter on us pretty fast, we didn’t get to explore much. I was being asked questions I couldn’t answer and only had my Maritime road map to help. It was very trying, but made it through. With lots of research, trying to explore when we could and a few trips to the Albert County Museum, I am now very well prepared! I give a full map tour with lots of fun stops, history & a few hidden gems. I love seeing excited happy faces about to go on adventures.
Quilts in the shop!
Its taken me a bit to get some in, so many things on the go, but here are a few!
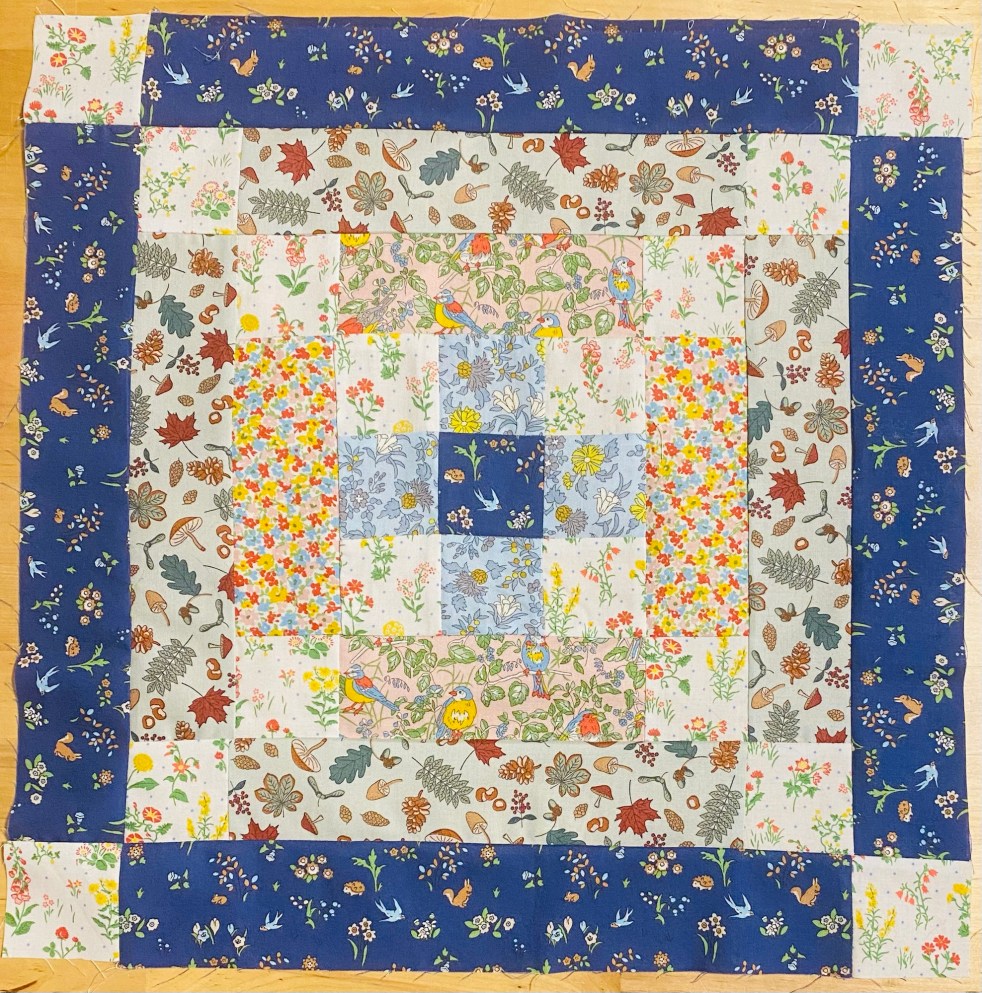
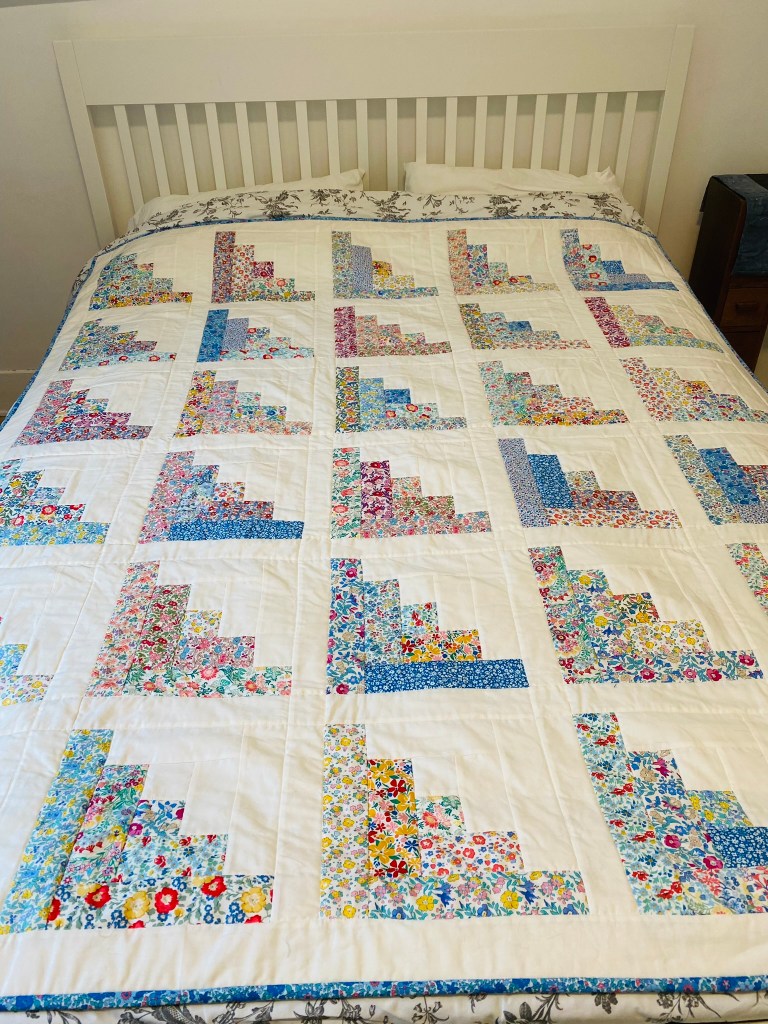
First picture is a log cabin with beautiful Liberty florals on a off white background. Florals can become very busy very fast, I find breaking it up with a white shade helps to calm the effect. I make up most of the quilts I make, most are off the cuff creations, this is one of them. I loved making it. Its
71 x 58 inches, fits the top of a queen (shown on a queen) The back is a white with blue rose Liberty print. More can be seen here: Log Cabin Liberty Quilt
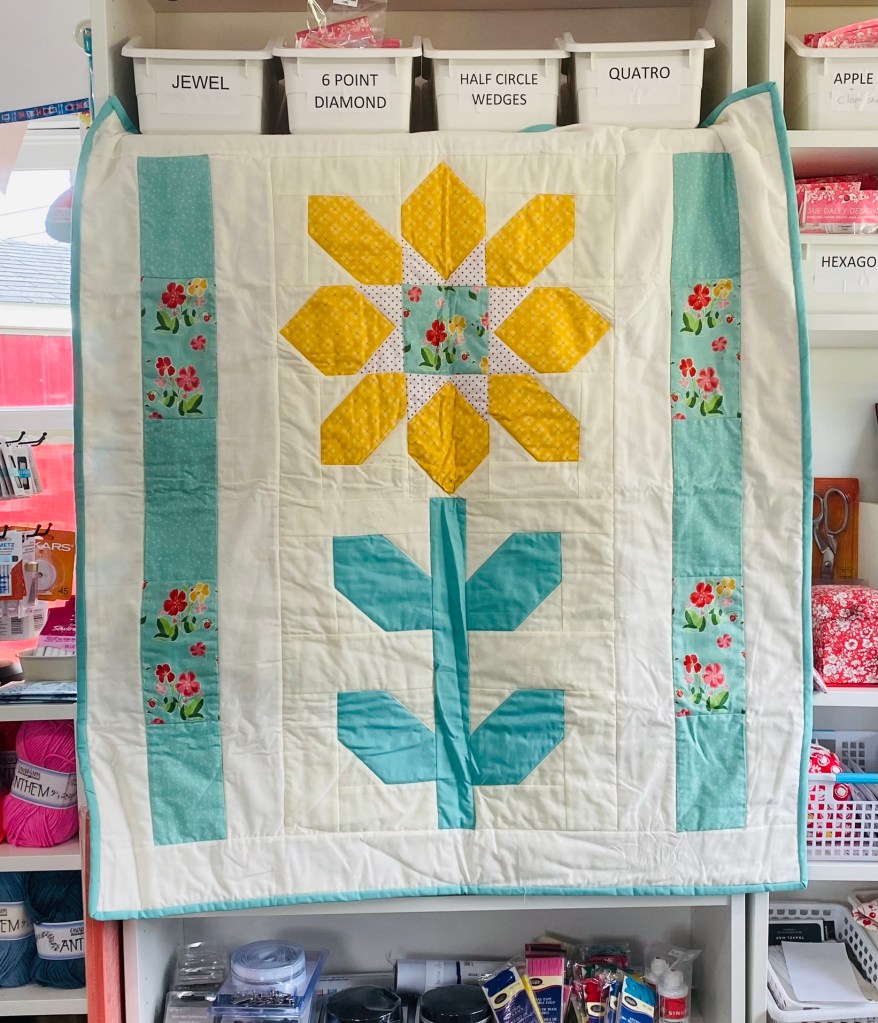
Sunflower Baby Quilt
I love doing big statement flowers! Bright colours and fun fussy cutting. It’s 39×35 inch, perfect for the pram, crib or a little play mat. More information here: Sunflower Baby Quilt
There are a few more, you will have to wait for the next post.
Shop Update:
There are a few new lines on their way in, finally! Adel in Summer (bright fun prints), Simply Country (blue & white), Live Love Glamp (fun camping line) & more Bon Voyage nautical prints.
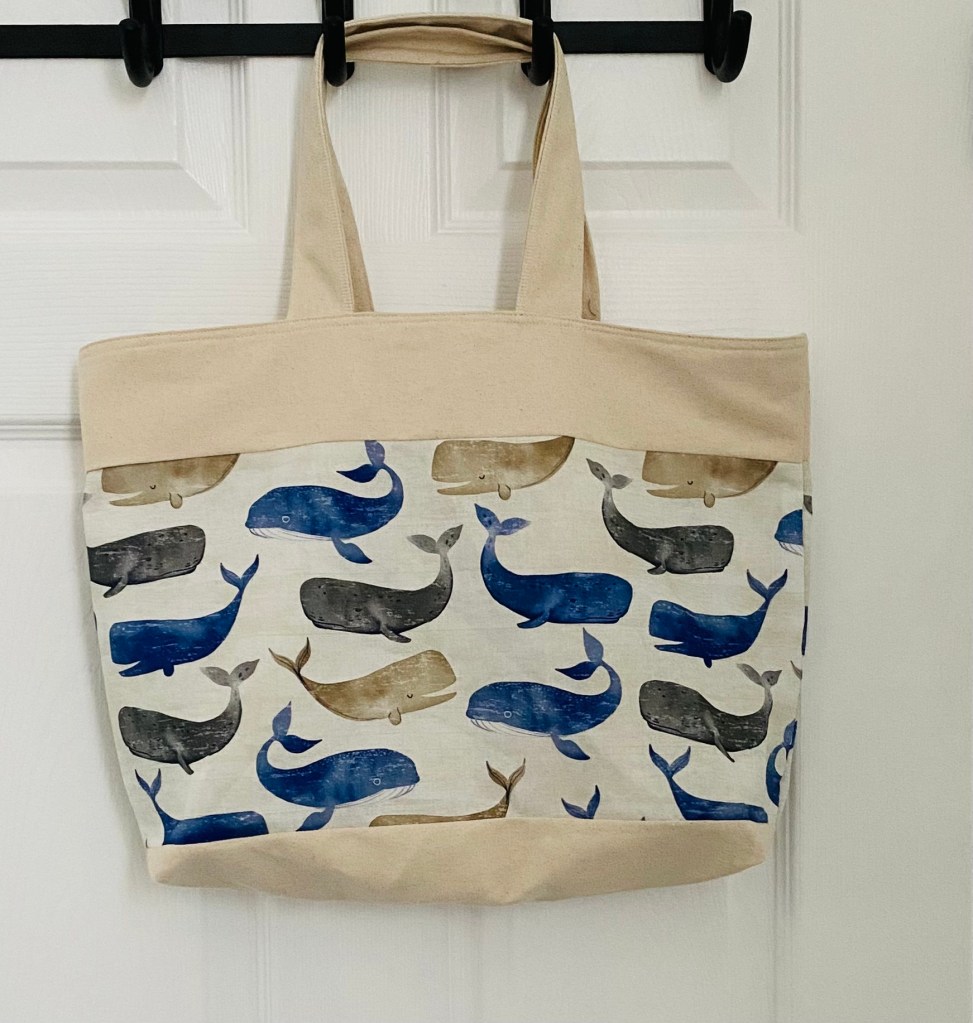
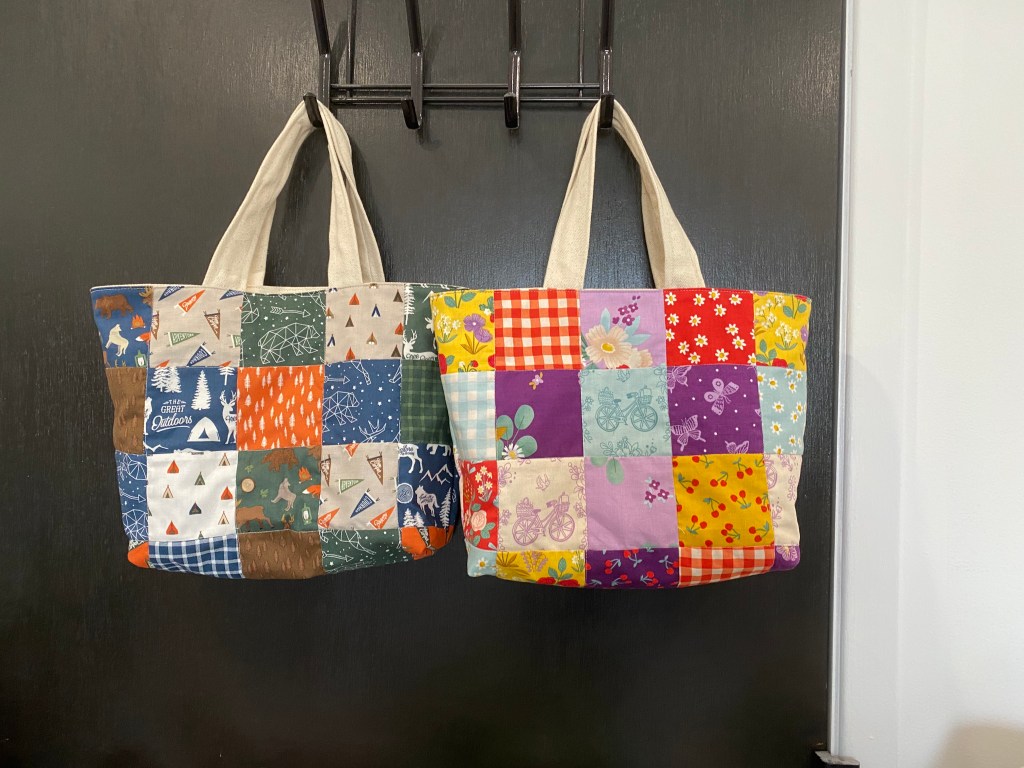
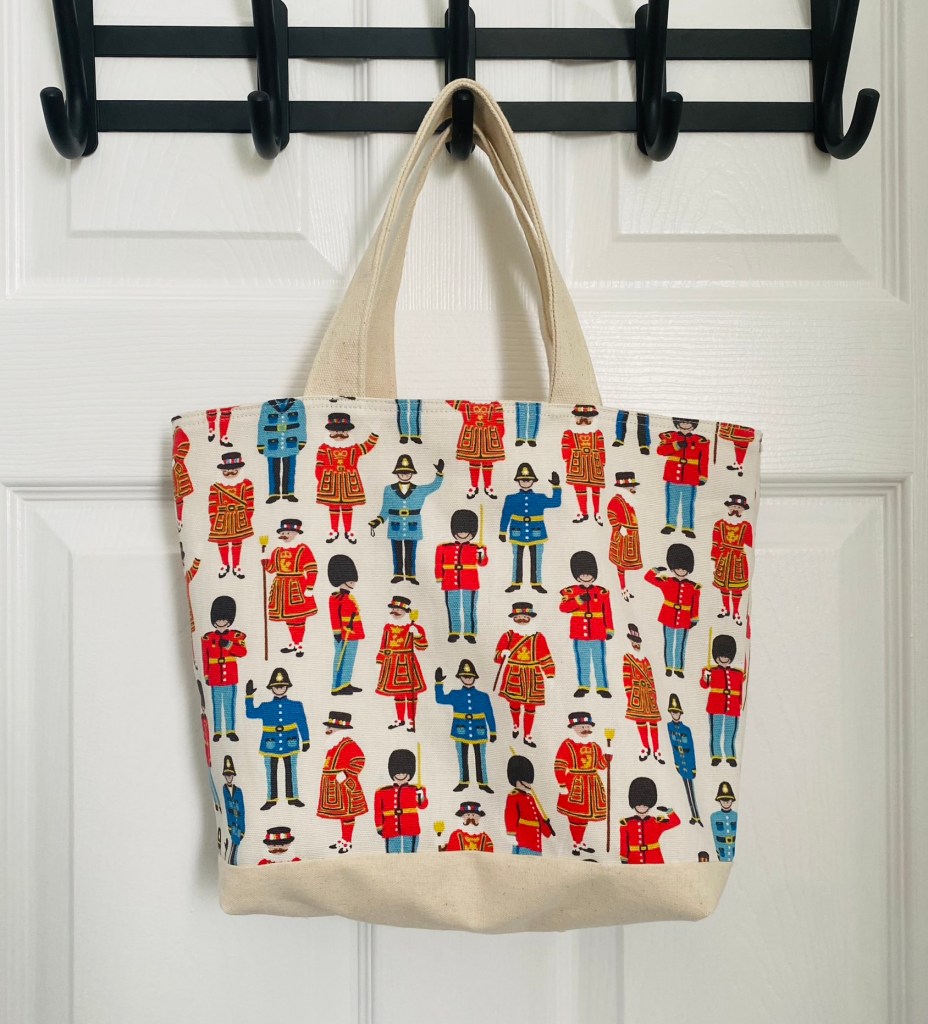
What is going on in the studio?
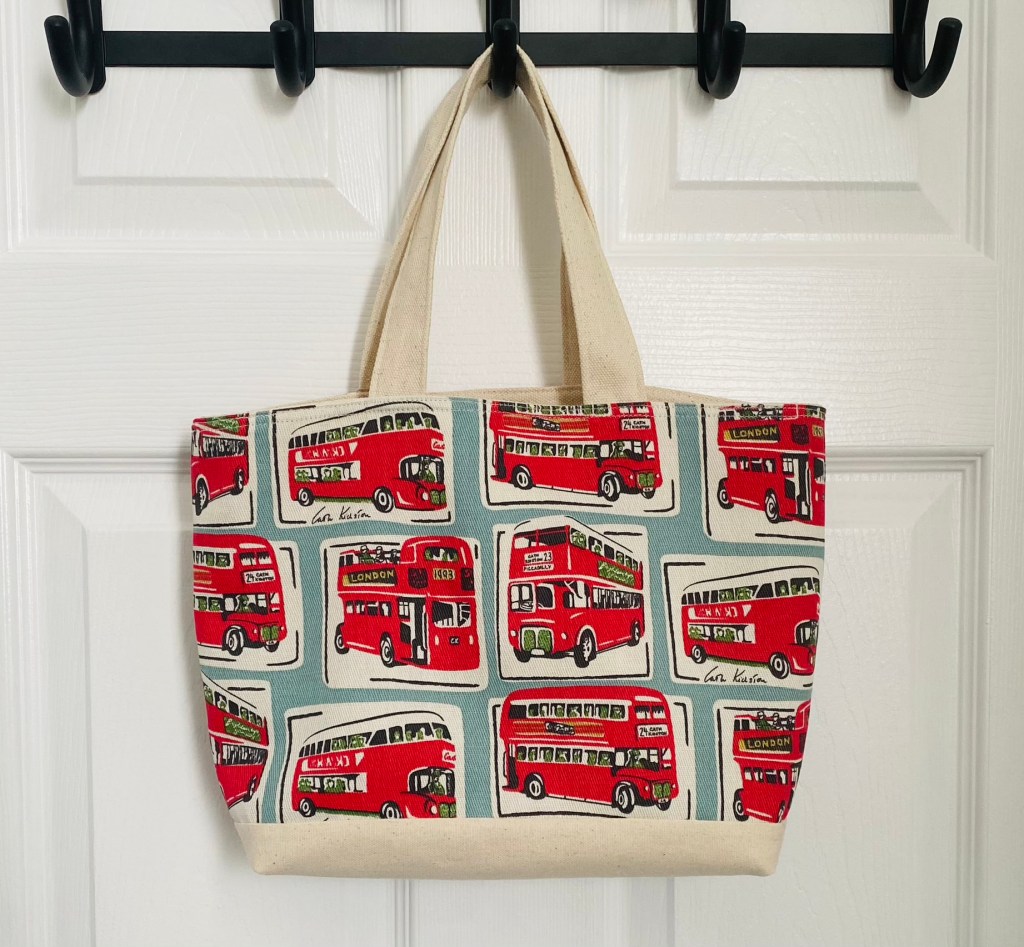
Bags, lots of bags. I love making useful items, I have two types of small bags and 4 tote sizes. All can be found at my shop. Boxy zippy pouches, everyday totes and market totes can also be found at The Starving Artist in Moncton, Wendy Johnson Pottery & The Outpost in Alma. Simple zipper pouches & book totes are also available at The Albert County Museum.
I have 4 cross stitch kits almost completed too. Finding the time to be on the computer long enough without doing accounting makes it harder to get them finished lol.
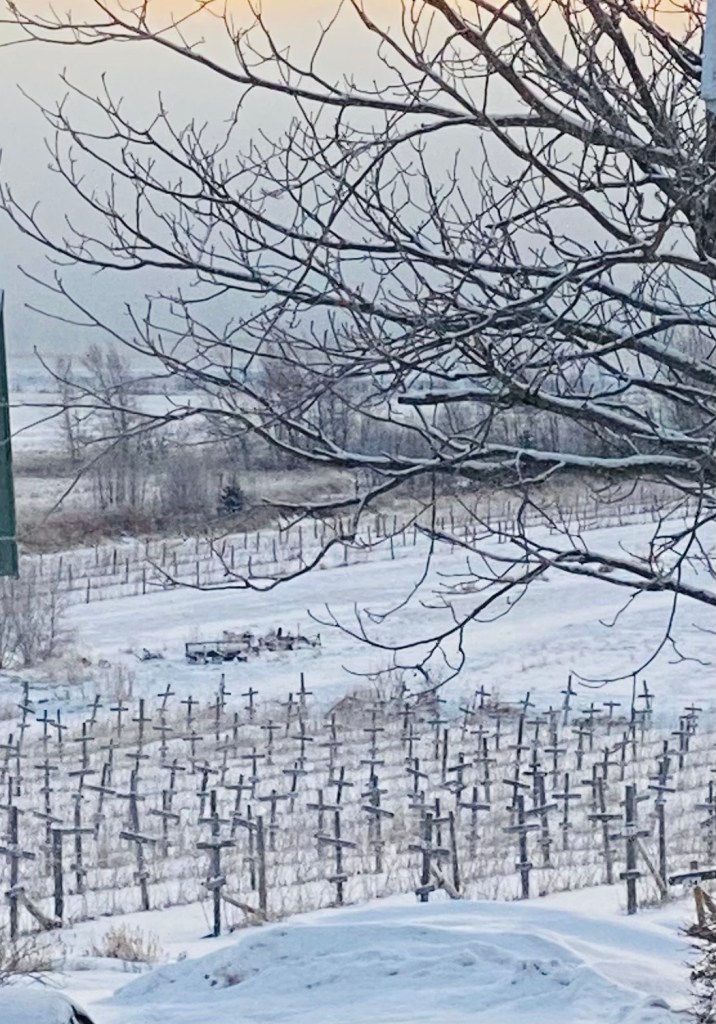
Wow its March! So far its in like a lion here, hopefully it will be out like a lamb. We just had a nice fresh snow dumping, which meant getting up at 5am to get the drive cleared for hubby to get out. It is quite peaceful outside at the hour.. the snow blower made it a bit loud, but still peaceful.
Once dawn broke it went from clear to super foggy over the river in seconds. The weather here is fascinating! Those are stakes for raspberries in case you were wondering what the crosses are.
In the studio I have been busy doing A: tons of accounting B: sewing I should not be doing as I need to get the accounting done!
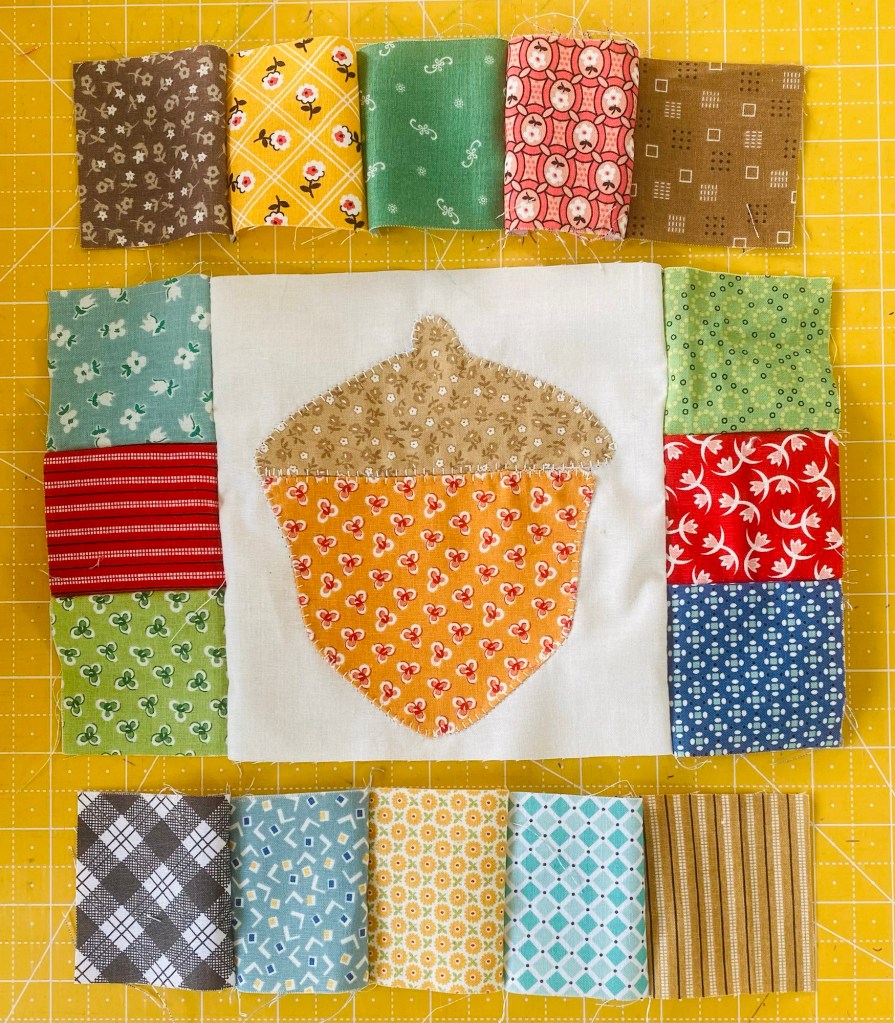
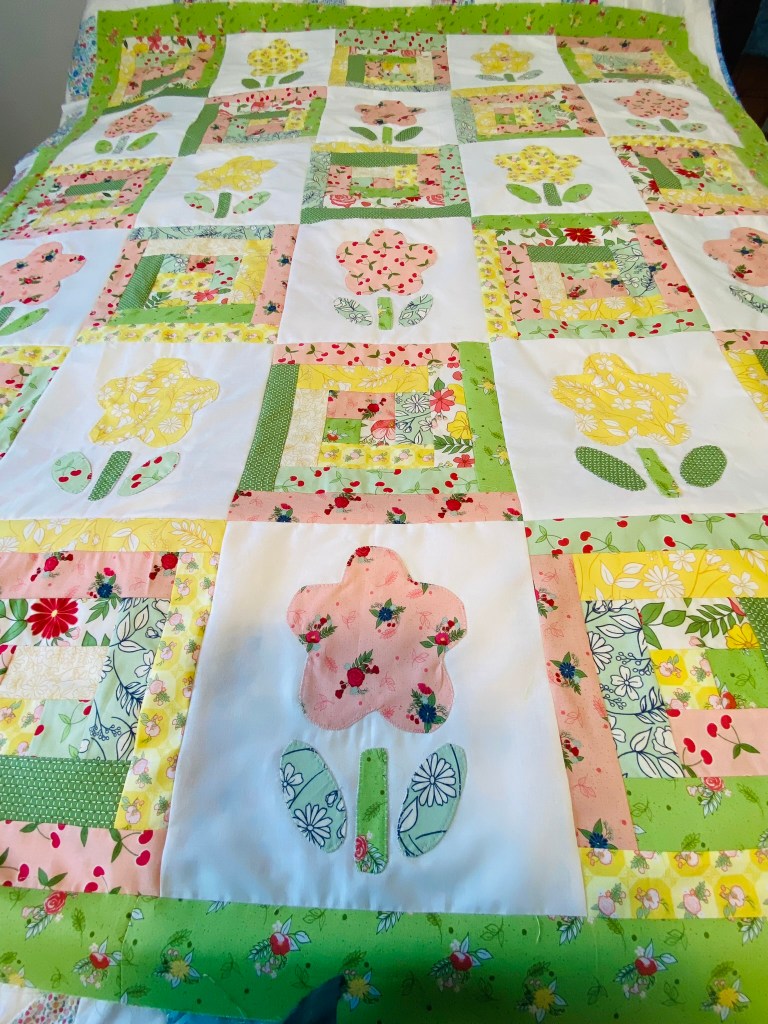
This quilt has been fun, its made with Reflections by Riley Blake. I loved all the prints but could not make a block I liked, I ended up trying a log cabin and voila! Loved it. To break it up I used a applique block taken from a pattern in the Cath Kidston book Sew! I have always wanted to use the sweet flowers in that quilt.
Its twin or couch size. The blocks are 10.5 each. I have a YouTube video tutorial available for it. I go through both blocks.
That pretty much sums up the week. I wish you all a wonderful week ahead!